Navigation2 for Small Robots
22 Nov 2023trinity-fire-fighting robots ros2 slam Earlier this year I built a small robot for the RoboGames tablebot competition. You can read about that robot in my previous post. I’ve now decided to update that robot for Robogames 2024, and also have the robot tackle the fire fighting competition.
Hardware Upgrades
I competed in this fire fighting competition about a decade ago, using a robot with just an 8-bit AVR microcontroller for a brain and a bunch of dedicated sensors. This time around, I’m going to leverage ROS 2, Navigation2, and a thermal camera.
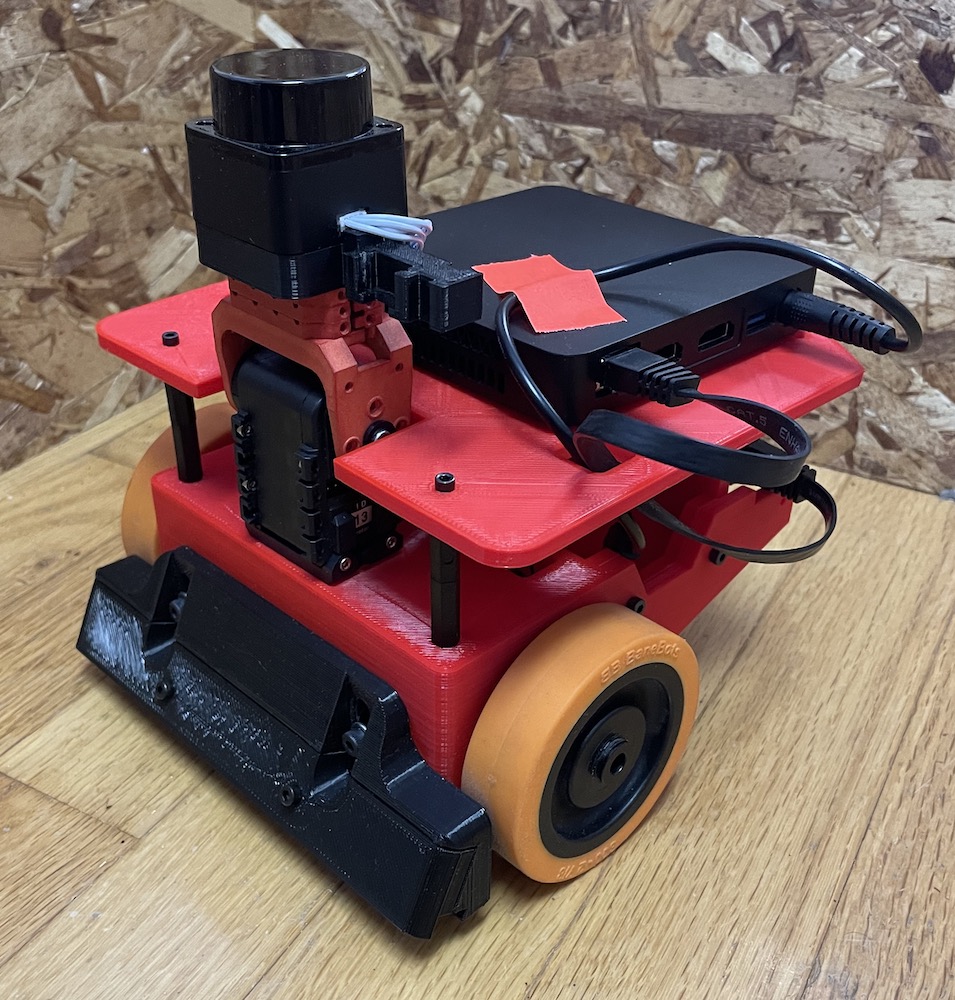
To accomplish this, I’m using a low-power Celeron-based computer. It’s smaller and lower power than any of the NUC computers I’ve used before and runs right off 12v. I added a second battery to support the computer.
I 3D-printed an entirely new chassis for the robot, in fire engine red. The neck assembly contain the LD-06 lidar, and will soon have the thermal camera and a fan to extinguish the candle:
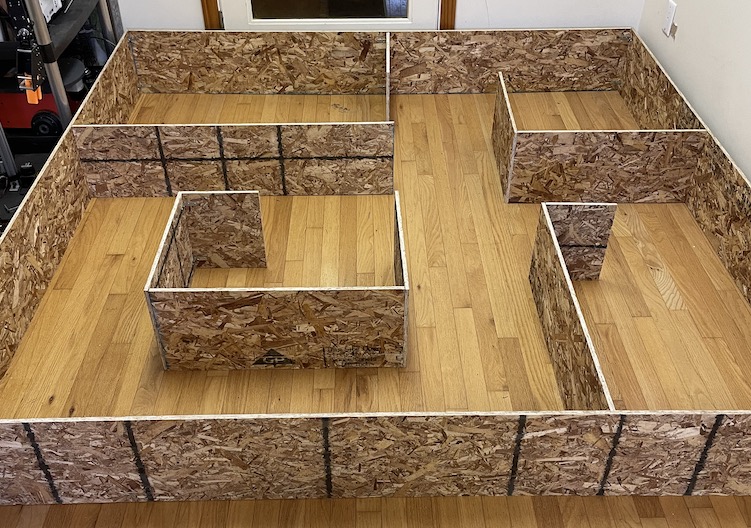
I also built a mock up of the arena. I didn’t quite have an 8’x8’ area for the arena, so I scaled everything to 7’x7’. In the real competition the hallways will be 2” wider, so I expect that navigation will work better in the real thing.
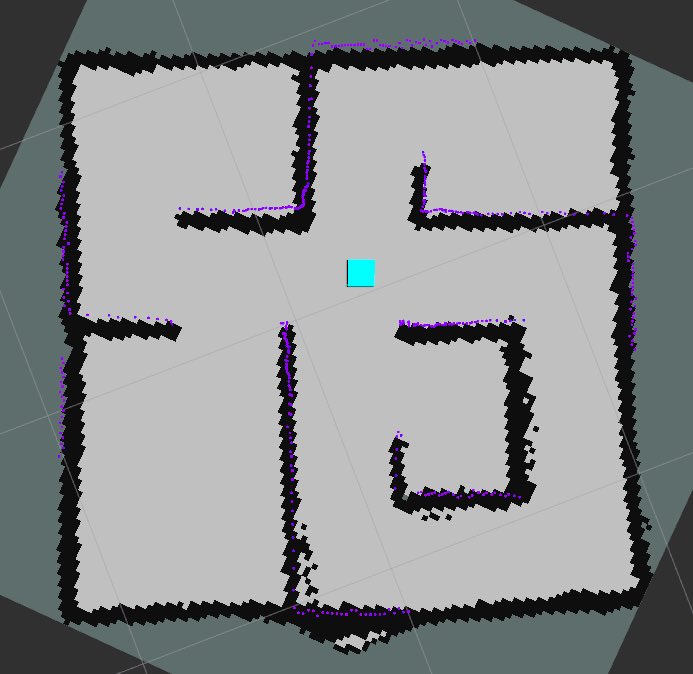
Step 1: Build a Map
The first step once the robot was mostly assembled was to build a map. The standard approach in ROS 2 is to use slam_toolbox.
Normally, this works pretty much out of the box. But the default parameters are all tuned for full size buildings, and my entire arena is about the same width as a typical hallway.
First change was to reduce the resolution of the map. I initially tried to map with a 1 centimeter grid, however this seemed to cause issues because there is a decent amount of noise in the low cost laser scanner I am using. A grid scale of 2 centimeters caused the scan matcher to perform significantly better without overly risking the map narrowing the hallways and doorways.
With the scan matcher now working, I began to map - but the map consistently exploded about half way through. I pulled up the visualization of the pose graph in RVIZ, and realized that we were getting false loop closures everywhere. The default loop closure search size is 2.0 meters - that’s as big as the whole arena. Turning this way down allowed the map to complete mostly intact.
Step 2: Localization
With a map in hand, attention is turned towards localization. There are a number
of parameters to tune here, and so visualization is a needed tool. Nav2 uses a
new, custom message for publishing the particle filter poses - so it is important
to install the nav2_rviz_plugins package.
With the particle filter poses visualized, I set about making a few changes:
- Since the map is so small, and the robot moves so slowly compared to a full
size robot, I reduced the
update_min_dparameter so that localization will be updated frequently enough. - I drastically reduced the
alphaparameters for the motion model. Since the robot is quite small, the errors are also quite small. To get good values for thealphaparameters, I basically tweak the settings until the particle cloud diverges just the right amount - not too much, but not too little either. I’ve frequently seen people tune the parameters to be too tight, leading to a lack of particle diversity, which can cause the cloud to converge to an incorrect value and never get back to the correct pose. - Since we are using the likelihood model, only two parameters are used for
the probabilistic model:
z_hitandz_rand. Since the environment won’t change during the competition, and there are pretty much no unknown obstacles, these can be set quite aggressively.z_hitis set to 0.98, andz_randis 0.02 - this basically encodes that there is a 2% chance of a measurement that is not based on something in the map.
At this point, localization was somewhat working, but not entirely reliable.
Starting to dig into the scoring a bit more, I reduced the value of
laser_likelihood_max_dist thinking that would make a big difference
since the default is 0.2 meters and my hallways are only about 0.35 meters wide.
But this had negligible effect. In reviewing the classic blue book (Probabilistic
Robotics by Thrun, Burgard and Fox), I noticed that I wasn’t actually changing
the correct parameter. sigma_hit was what really needed adjustment
since it controls how fast the probability drops off. Dropping this from
0.2 to 0.025 made a huge improvement in localization.
A few random remarks:
- In reviewing the blue book I noticed that pretty much every implementation of AMCL out there (and there are now several) don’t treat unknown space outside of the map the way the book does. Every implementation propagates the Gaussian values in both directions from the wall, rather than only going into the free space that was raytraced during the map building phase. It would seem that in some environments, this change could actually help with localization accuracy.
- In working with such close range data, I started to wonder if maybe there should be some accounting for how long the range measurement is when computing the probabilities. Most of the lasers on the market today specify the error as a percentage of the range measured, and all of them have worse accuracy for longer range measurements.
Step 3: Navigation
The next step is to fire up Navigation2. I setup my config and launch files as a copy of the configuration that I used for the UBR-1 robot navigation and then started adjusting for the application:
- I reduced the costmap size to 0.02 meters to match the map, tightened the goal tolerances, and defined a square-ish footprint for the robot.
- For my local controller, I set the appropriate velocity and acceleration limits and drastically reduced the lookahead distances.
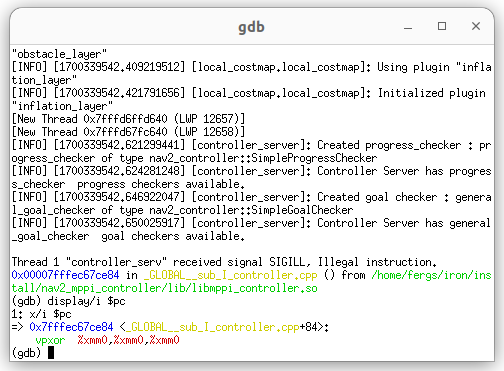
I was not getting the results I wanted at first with the GracefulController, so I tried switching to the new MPPI controller. However, that turned out to not be so easy. The MPPI controller is heavily optimized with vectorization/SIMD instructions - but - I’m on a fairly low power Celeron processor that doesn’t support many of the newer SSE / AVX instructions. I tried to build from source and deactivate these optimizations, but kept running into an illegal instructions and eventually returned to tuning the controller I know.
I will note that the Navigation2 documentation has some great documentation on debugging in complex ROS 2 projects. These notes allowed me to launch the controller server in an xterm window, attached to gdb, and see exactly what illegal instruction I was hitting:
Next Steps
That is pretty much where this project is at right now. I’ve got semi-reliable navigation that isn’t entirely fast yet - but that’s not bad for just a few hours of work. I’m going to continue tuning the navigation while also getting the higher level controls worked out for the robot to complete the fire fighting task.