Back in 2015, we started a “3-lb plastic fighting robot” league.
The idea was pretty simple: 3d printers were decent, and 3d printed parts generally didn’t destroy the expensive electronics and batteries in the robots.
It eventually took on the name “Weaponized Plastic Fighting League” and I bought yet another domain name - weaponizedplastic.com.
I never got around to actually building a robot back then because you generally don’t have much free time as the CTO of a startup that has just closed a Series-A funding round.
But I did end up doing a bunch of video work to capture the matches, and edited some decent videos.
We also live streamed one or two of the events.
Ten years later, in March 2025, myself and a friend from Fetch decided to reboot things, I built an arena and we’ve now had two annual events on the farm in New Hampshire. Here’s the highlight reel from 2025’s event (the 2026 event video is coming soon):
My Robot: Drumnado
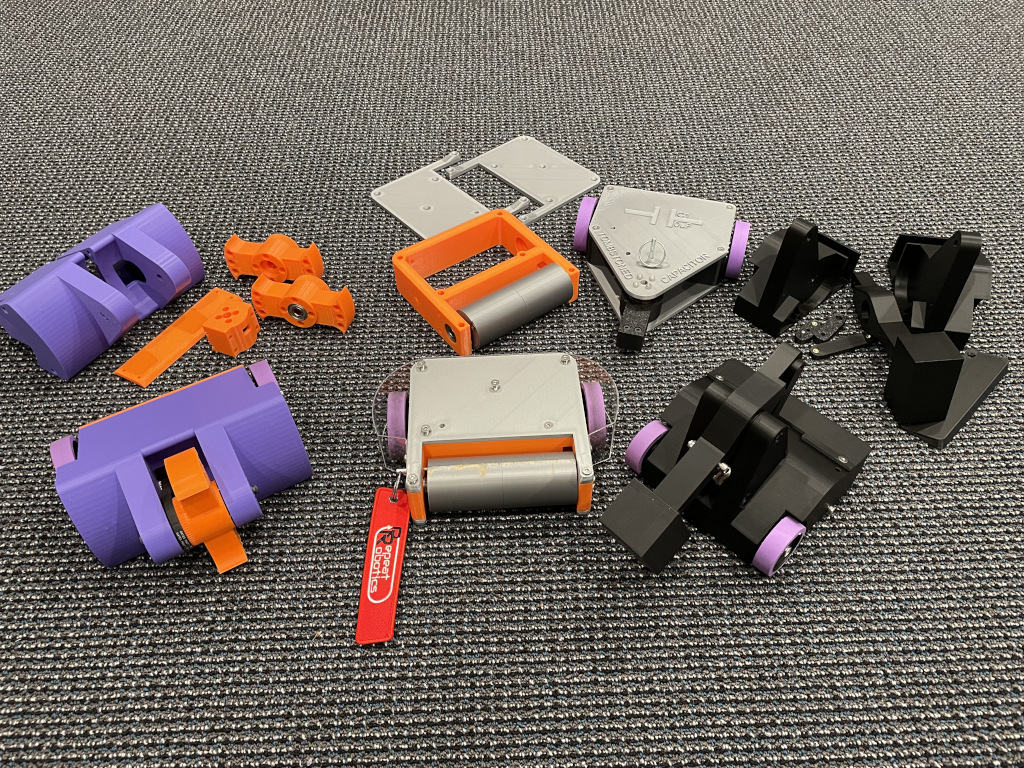
In addition to building a hammer robot and a number of bar-spinners for my nephews, I also built an entry for myself - a drum spinner:
Initially I forgot to come up with a name for the robot - and used the same “Issy” moniker that I’ve used for ages with my mostly unnamed robots.
During the 2026 event, I had a wheel get stuck, causing me to have to drive the robot on one wheel with the assistance of the gyro force of the drum to lift the other wheel off the ground.
I finally had a name for the robot: Drumnado.
The design is fairly simple - differential drive using motors from
Repeat Robotics.
A super cheap 27mm diameter brushless motor is used for the drum motor.
The other end of the drum is held in place with a bearing and shoulder screw.
Controls were typical RC.
Drumnado: 2025 Results and Learnings
In 2025, the robot was quite successful, finishing 2nd.
I had two major failure cases.
First, the robot occasionally would get stuck on debris in the arena.
This was fixed for 2026 by going from wheels that were 2-3/8” to 2-7/8”, adding a full quarter inch of clearance whether the robot is inverted or not.
The second issue was that the drum assembly occasionally failed.
The bearing was heating up and coming loose from the robot body, this would then allow the drum to move side to side, often getting stuck against the robot body.
Numerous upgrades were deployed in 2026 to fix this issue.
First, I bought a better bearing.
Those super cheap, no-name bearings end up generating a lot of heat.
My bearing budget went from 5 bearings for $8 all the way up to $14 for a single bearing.
The bearing was also changed to a flanged style.
This effectively doubled the surface area involved in keeping the bearing from moving sideways.
I also fixed a number of tolerance issues in the original design so that the drum could not back itself onto the motor.
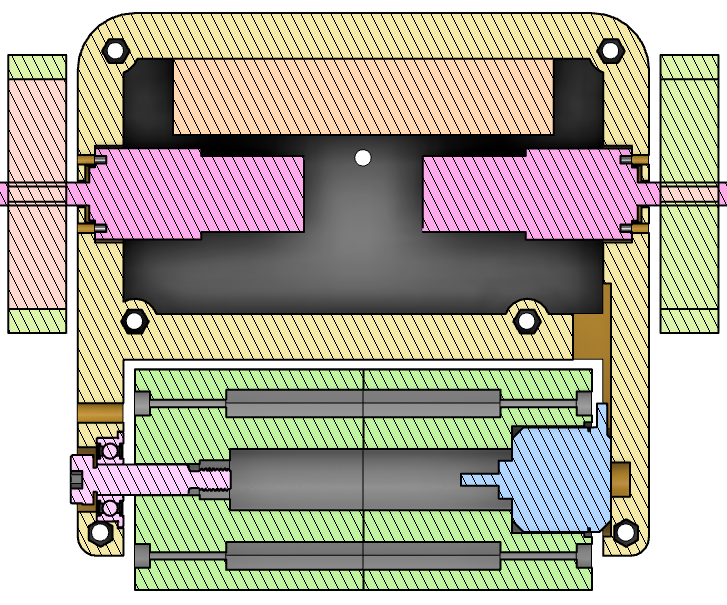
The cross section below shows the updated bearing setup for 2026.
The spacers between the bearing and the drum are not shown modeled in the CAD.
I had a few other wish list items, but mainly I wanted better mixing options than I could pull off with off-the-shelf motor controllers and radios.
For 2026, I decided to build a custom motor controller (that will be the topic of a future post).
Drumnado: 2026 Results and Learnings
The 2026 robot looks nearly identical to my 2025 entry, until you place them side by side.
The larger drive wheels and larger drum fixed concerns about getting stuck on things.
The bearing changes prevented heating issues and kept the drum from moving side-to-side.
However, everyone brought their A-game this year, and 2026 was a much more destructive competition.
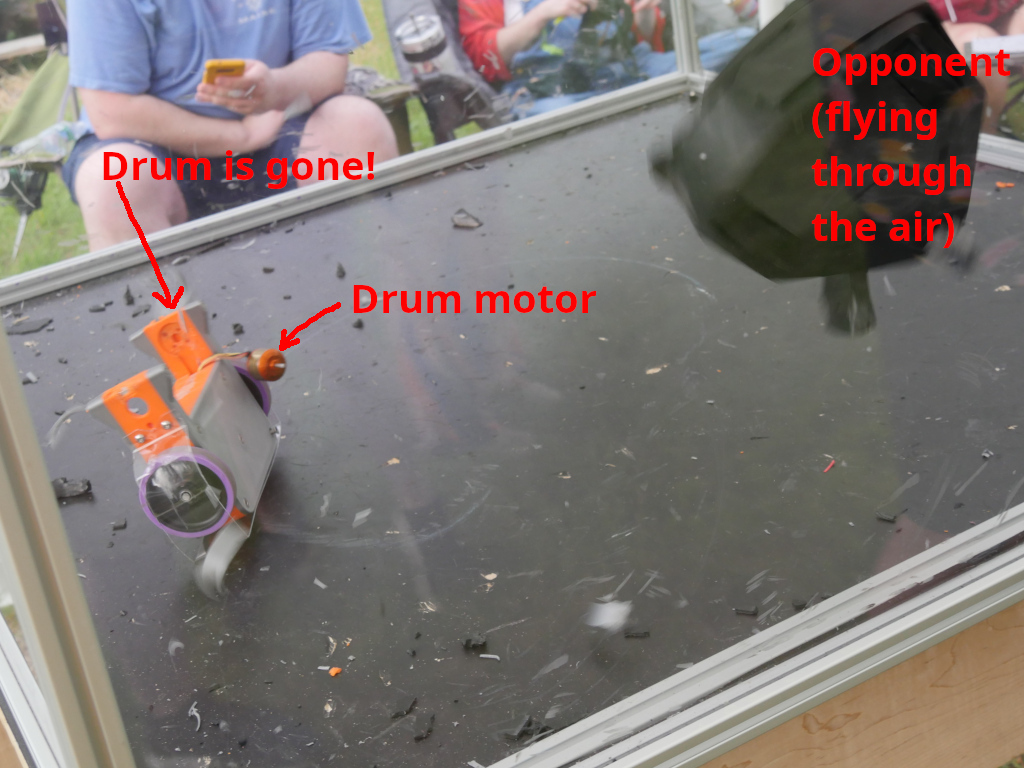
In the penultimate round, Drumnado (and the robot it was fighting) completely self destructed their weapons from a hard hit:
Since both robots were largely destroyed, we ended up taking about half an hour to allow rebuilds
for a rematch (this had been Drumnado’s first loss on a double elimination bracket, and so we
needed to rematch the exact same robots to decide who would be in first place).
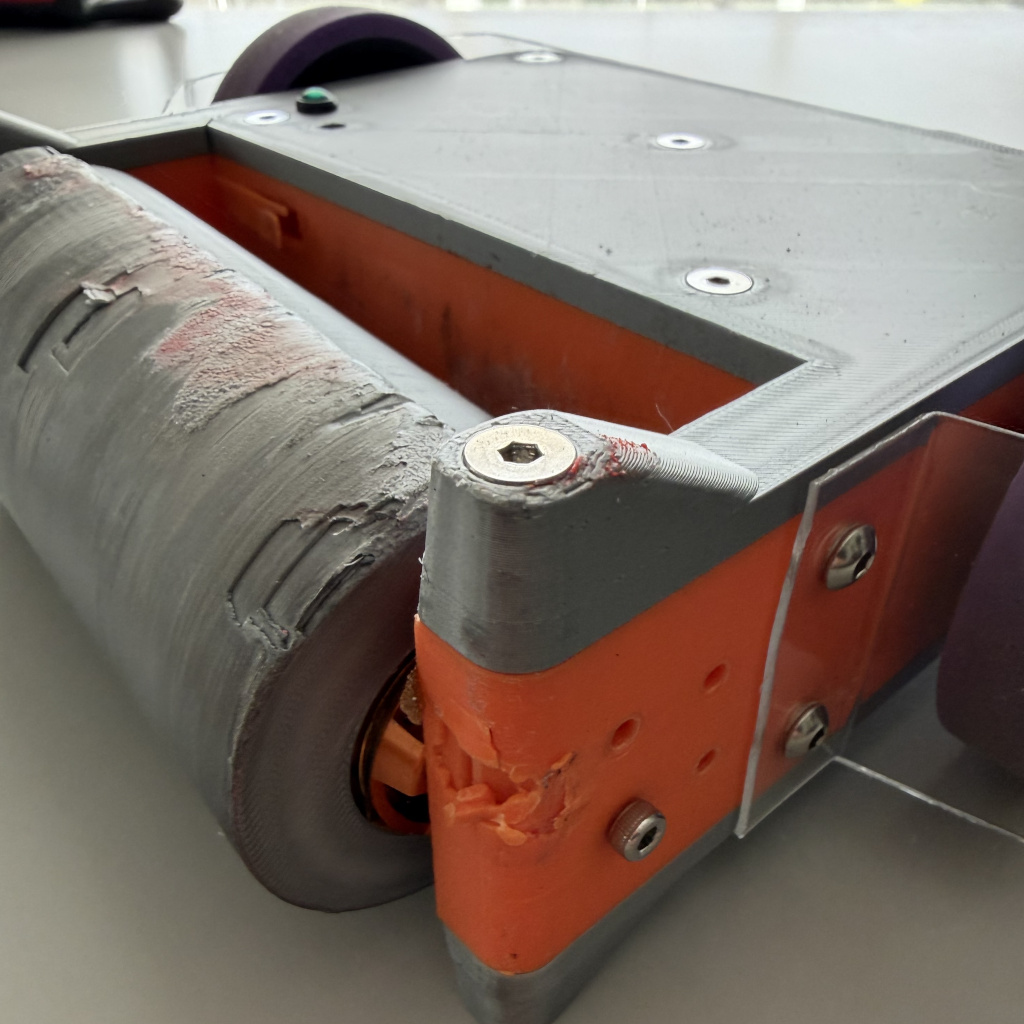
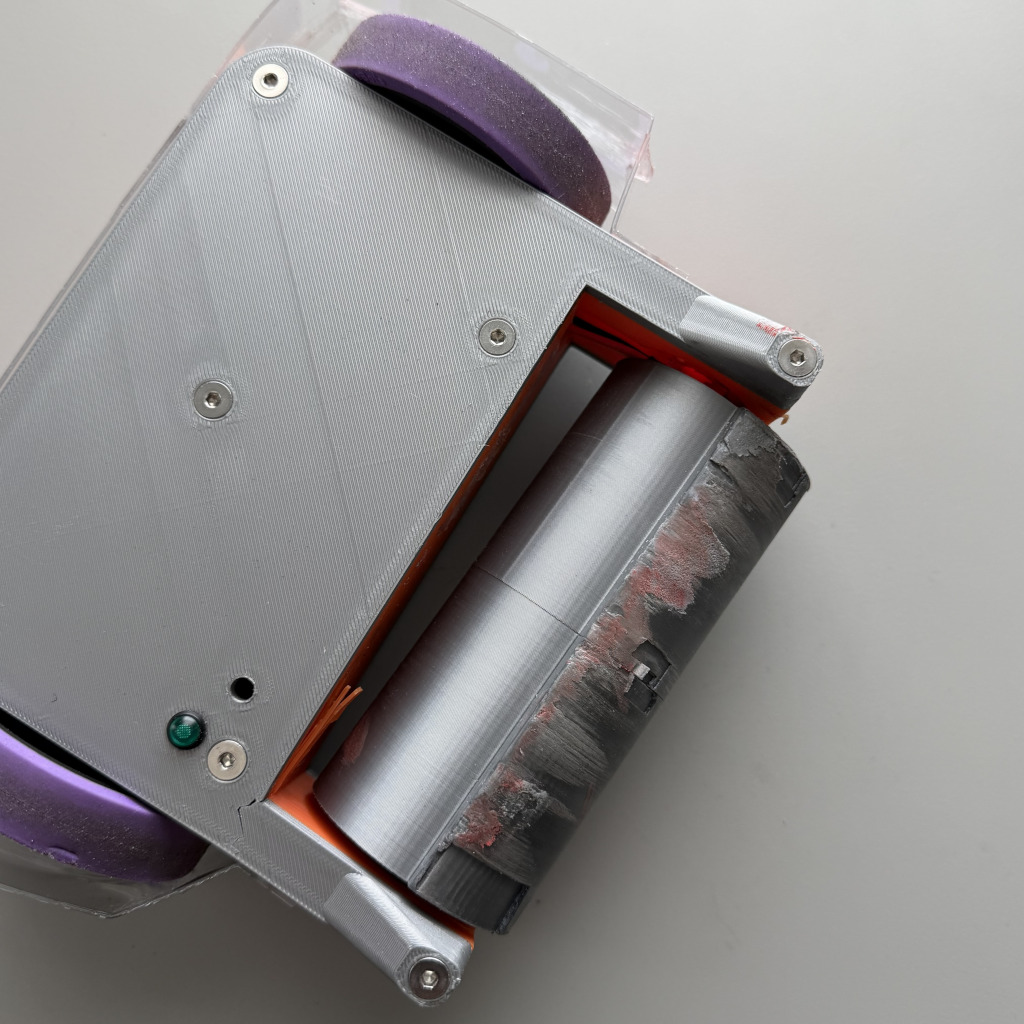
Drumnado won the final match, but was heavily damaged:
Drumnado 3.0
The parts are already coming off the printer for the next version of Drumnado, which needs to be ready a bit sooner than next June since there is going to be an event in Austin Texas in about two months time:
The stackup for the drum spinner has always been tedious to assemble - involving numerous spacers that are hard to insert between the bearing and the drum.
That was especially evident during the emergency rebuild before the final match.
Matches are likely to be closer spaced for the Austin event, so ease of repair is the top goal for Drumnado 3.0.
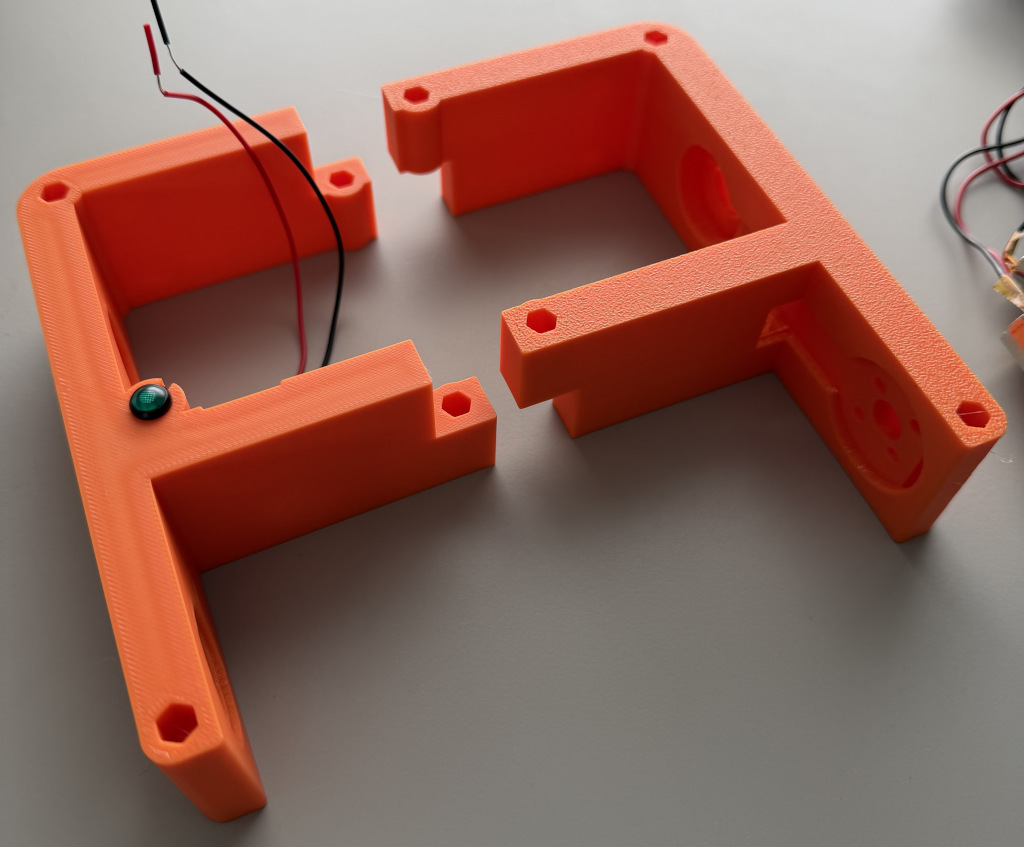
I intend to solve that issue with a completely revamped body that is split into two parts, giving easier access to the spacers.
A standoff will be used to lock the two pieces together in the center:
I’ll also be using some Loctite on those motor screws that kept falling out - something that wouldn’t have really been possible without the new split body design.
MoveIt2 is still evolving, and the Debian builds seem to be quite out of date most
of the time, so I would suggest doing a source install. I’ve had
good results lately with the main branch building on both Iron and Jazzy. In
addition to the moveit2 repository,
I’m also building the ros2 branch of
moveit_msgs and
moveit_task_constructor from source.
MoveIt2 Setup Assistant
Everything in MoveIt really starts with the MoveIt Setup Assistant (MSA). Unfortunately,
the MSA was one of the last components migrated to ROS 2 (at least partially because launch
files are massively different from ROS 1). While the MSA is still a bit brittle,
it is pretty well documented with a
tutorial
which I followed quite closely.
The MSA basically exports a new ROS 2 package, typically called [robot_name]_moveit.
You can find my ubr1_moveit export
here.
This package includes a custom set of configuration and launch files for the robot
to use MoveIt2. In comparison to the files generated in ROS 1, these end up being a bit
less easy to modify since most of the “launch” file is actually part of the
moveit_config_utils package.
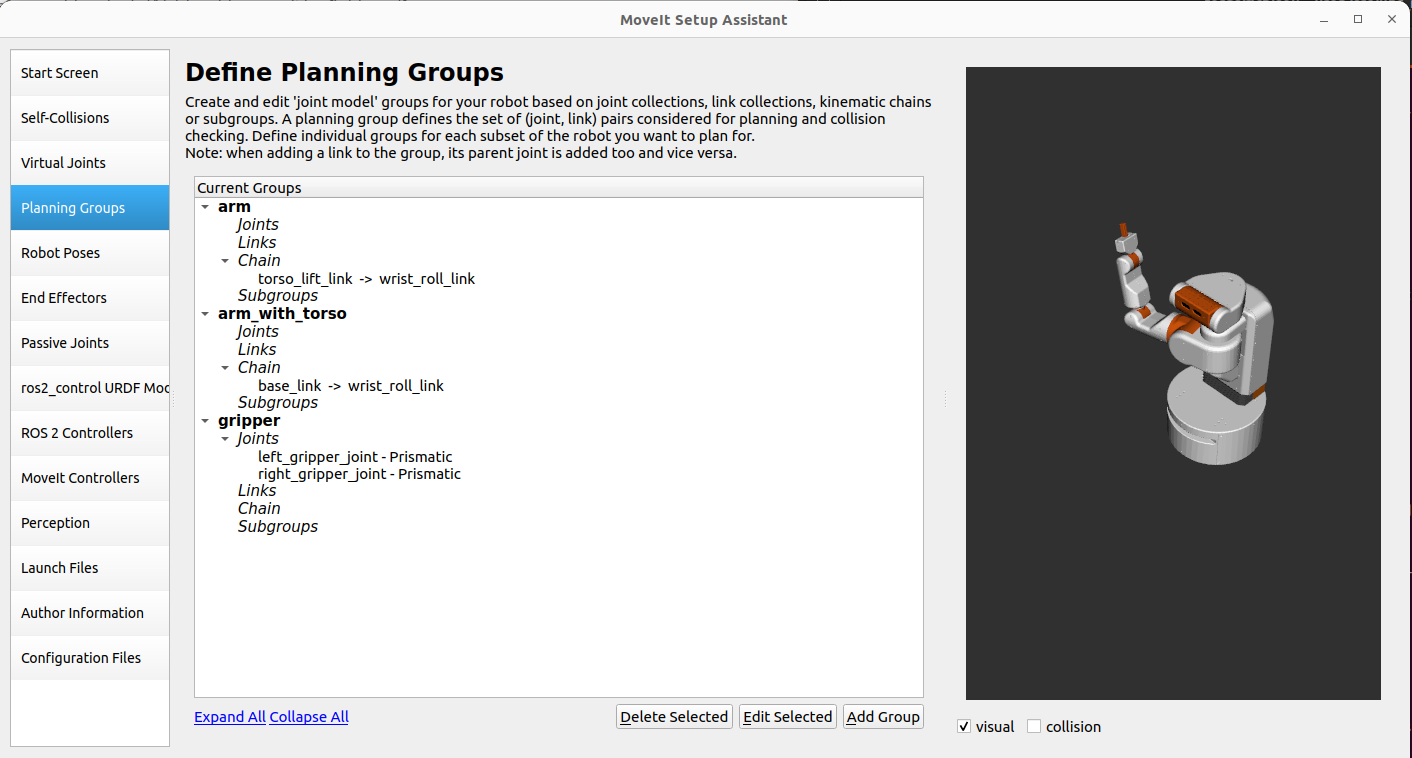
For the UBR-1, I defined three planning groups:
arm - This is defined as the seven joints of the arm and is the usual
planning group. I also defined a ‘ready’ pose that I use for getting the
arm out of the way of the camera.
arm_with_torso - This is again defined as joints, but this time including
the torso lift joint. This planning group is occasionally useful if you need
a larger vertical range of motion.
gripper - This is defined as the two gripper joints, and no IK solver
is configured for the group. Poses were defined for “open” and “close”.
After first exporting the MSA config, I had make a few minor tweaks. The most notable
is that I had to add acceleration limits to the joints as the Time Optimal Parameterization
now requires acceleration limits. These values were added to the config/joint_limits.yaml
file.
I also had to manually update the collision matrix in the SRDF file to allow collision
between the bellows and the torso/base. I’m not sure why the collision checker in the
MSA didn’t pick up that these are always in collision, but I couldn’t plan without these
collisions being allowed.
Definitely commit any changes to your configuration before re-exporting with the MSA because
it will override/lose some changes in many cases and git diff will help you track what
was lost.
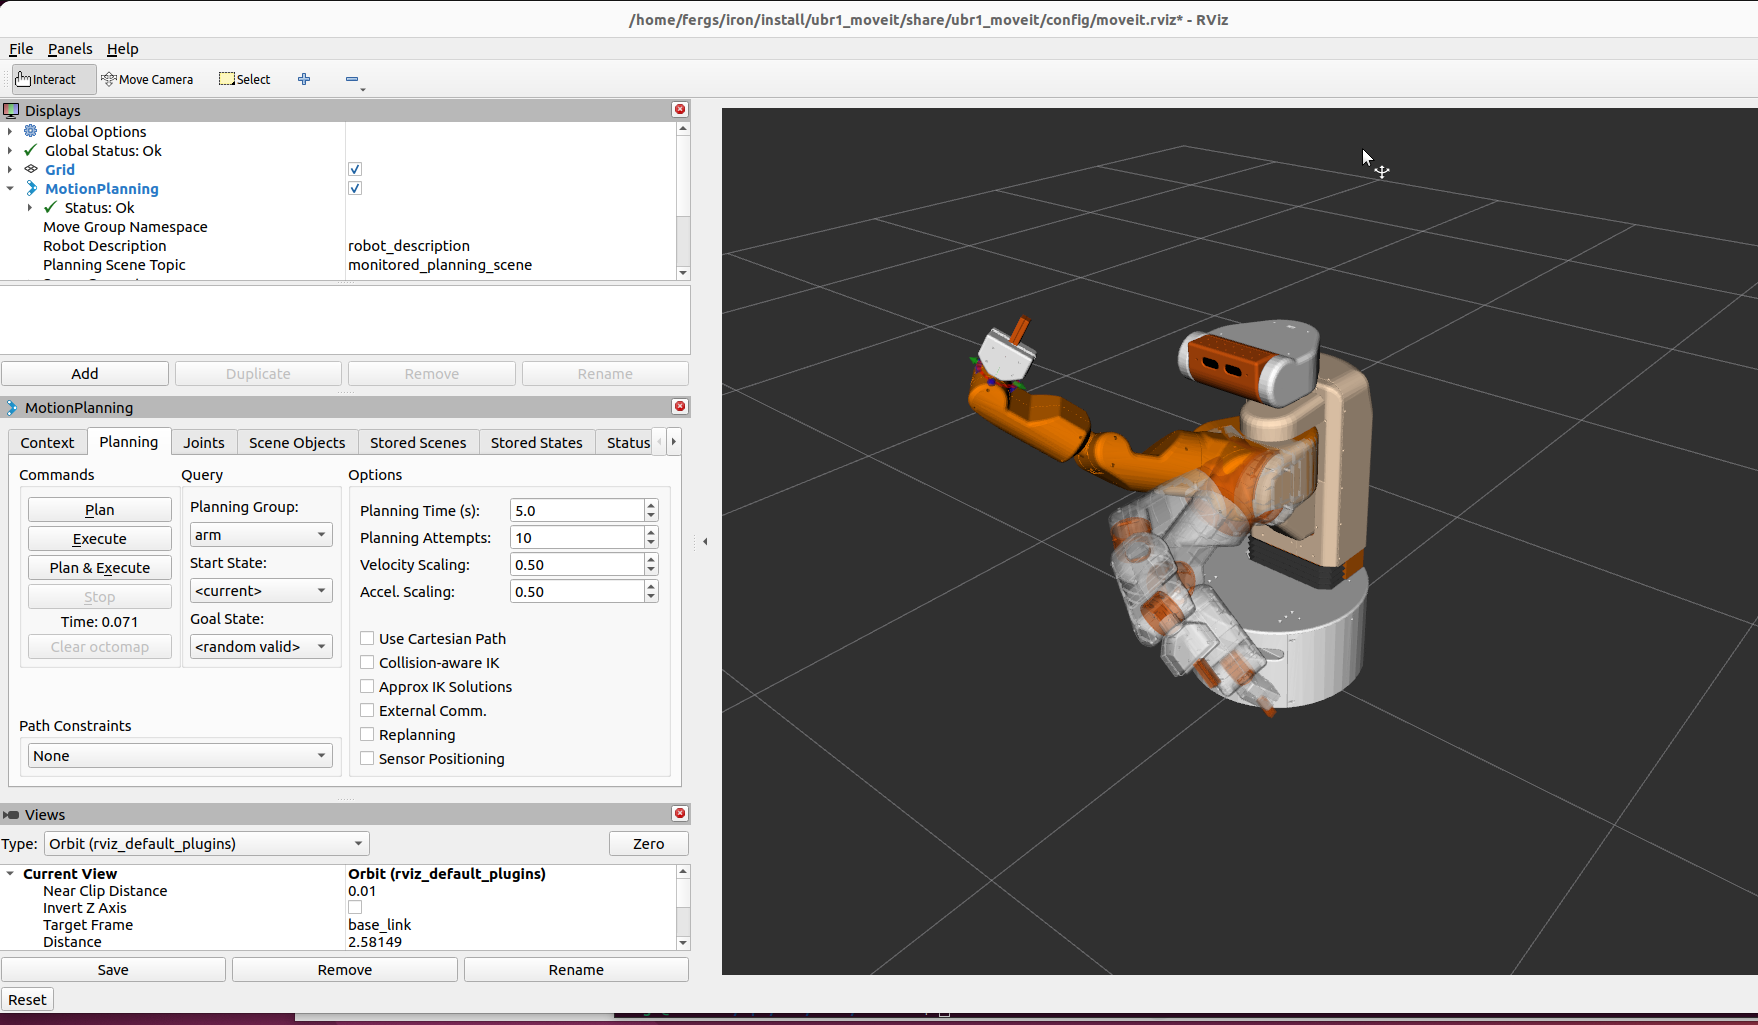
Once we have an export, we can test things using the demo.launch:
ros2 launch ubr1_moveit move_group.launch
Planning worked well but I was unable to execute any motion plans in the demo environment.
I found that because I had two groups using the arm - I needed to switch controllers
using the rqt_controller_manager tool. This isn’t an issue on the real robot
where I use robot_controllers instead of ros2_control, which does automatic
switching of controllers when they receive an action goal.
One thing to keep in mind - when loading the rviz2 plugin for MoveIt2 - always use the
RVIZ2 launch file generated by the MSA. Since there is no shared parameter server,
this launch file will properly populate the kinematics parameters for rviz2. Without
those parameters, you’ll not be able to plan (and the interactive markers will be
missing).
I found you might also have to set the DISPLAY variable in your environment if
running headless.
MoveIt2 Without ros2_control
Much of MoveIt2 assumes you are using ros2_control - but I’m not.
I continue to use my alternative framework
robot_controllers.
This is still supported in MoveIt using the simple controller manager
which does no controller switching, but interfaces with the standard
control_msgs actions expected for arms and gripper.
Some Interesting Debugging
Once I had MoveIt2 setup to interact with the robot, I could plan motions and move the arm
without issue, but I was unable to actually get MoveIt2 to control the gripper. It turned out
that the action server implementation in my gripper driver wasn’t entirely correct:
The driver wasn’t storing the shared pointer to the active goal.
This caused the goal to go out of scope and be destructed.
In theory this would be an easy issue to debug - but two things threw me off:
I had been using my teleop node to open and close the gripper without issue - but at
no point was I actually looking at the responses from the action server, it was just
letting things run open loop.
MoveIt2 reported that the action failed due to “preempted”. This didn’t make much
sense since none of the “preemption” logic in my action server was triggering any
of the logging messages.
I ported this driver to ROS 2 quite some time ago, but now the easy approach if you only
need one action goal active at a time would be to use the simple_actions package. I
did just that later on when calling my grasping perception for the pick and place demo.
Simple Grasping
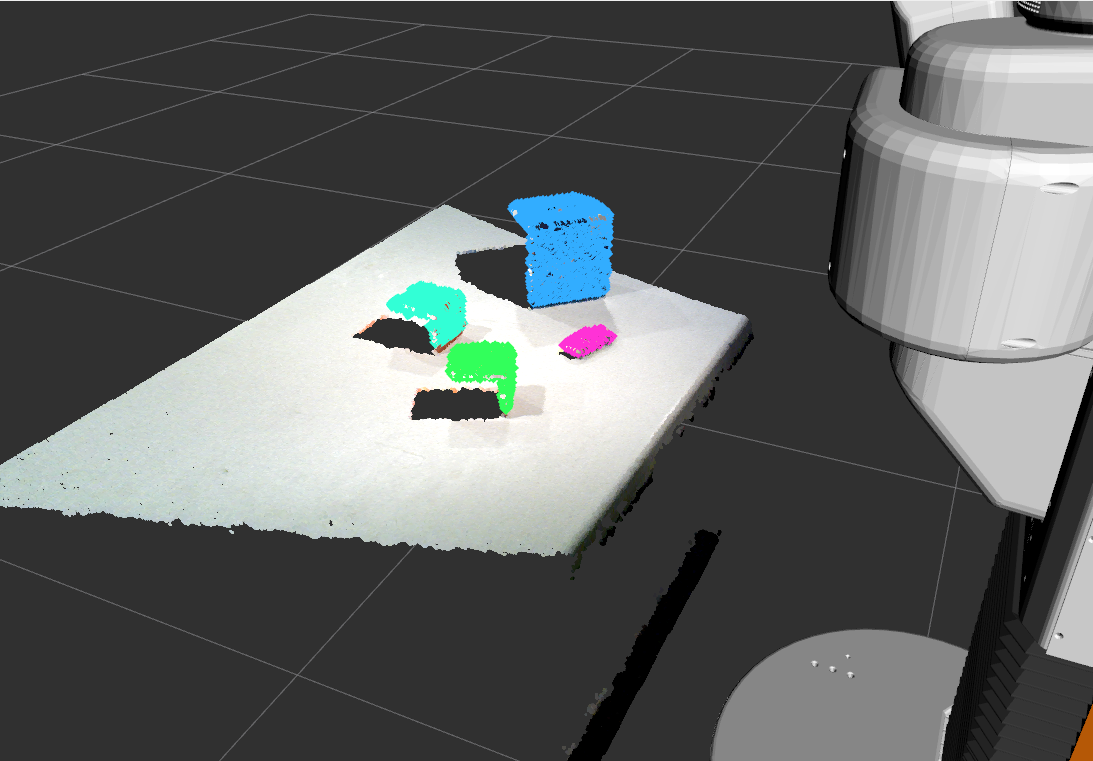
Perception is really the weak part of the ROS ecosystem. There are numerous packages
available for controls and planning, but not much for perception. Years ago I created
a package simple_grasping which segments a point cloud into objects and support
surfaces which can then be used for pick and place. Actually porting the code to
ROS 2 was fairly straight forward.
One of the issues I’m seeing in Jazzy that I have not yet resolved is that for large messages
(such as images or point clouds), a reliable publisher connecting to a best effort
subscriber seems not to work - there isn’t any issue with QoS mismatch, but no images get
through. My workaround has been to add QoS overrides to a number of nodes. For instance,
in simple_grasping, I have the following code:
// Would prefer to subscribe to head camera cloud as best effortrclcpp::QoSpoints_qos(10);points_qos.best_effort();// But due to issues in Jazzy, allow overriding QoS at runtimerclcpp::SubscriptionOptionssub_opts;sub_opts.qos_overriding_options=rclcpp::QosOverridingOptions::with_default_policies();cloud_sub_=this->create_subscription<sensor_msgs::msg::PointCloud2>("/head_camera/depth_registered/points",points_qos,std::bind(&BasicGraspingPerception::cloud_callback,this,_1));std::bind(&BasicGraspingPerception::cloud_callback,this,_1),sub_opts);
Not every feature from MoveIt in ROS 1 made it into MoveIt2. One of the big features that
was dropped was the pick and place part of move_group. Users are instructed
to use the MoveIt Task Constructor (MTC).
It seems to be a common theme in ROS 2 that things are designed to be much more capable,
but then are much harder to use and also poorly documented. This theme holds up for pick
and place. I ended up spending more time setting up an MTC pick and place node than
all of the other steps above combined.
There is a single tutorial
that shows how to do pick and place with a Franka arm. The tutorial uses
several simple components inside MTC to do the grasp generation and place
generation.
My implementation in the ubr1_demo
package is based off the tutorial. The files can be roughly described as:
pick_place_task.cpp - Used to create an MTC task for pick and place. It largely follows the
tutorial, with a few minor tweaks:
Moved the allowCollision modifications of the planning scene a bit earlier in the pick pipeline
as I was having issues with plans falling due to perception being imperfect and the object to
be grasped being in contact with the table top.
Switched to using a custom GenerateGraspsFromMsg grasp generator.
pick_and_place.cpp - Actual node that calls find_objects action from the simple_grasping
server, creates a pick and place MTC task, and then executes the task. This node uses David Lu’s
simple_actions package to call the find_objects action server.
generate_grasps_from_msg.cpp - A custom pose generator that uses the grasps created by the
simple_grasping package rather than a hard coded list of rotations.
launch/pick_place.launch.py - In order to load configurations (such as kinematics), the launch
file uses MoveItConfigsBuilder to add proper parameters to the node.
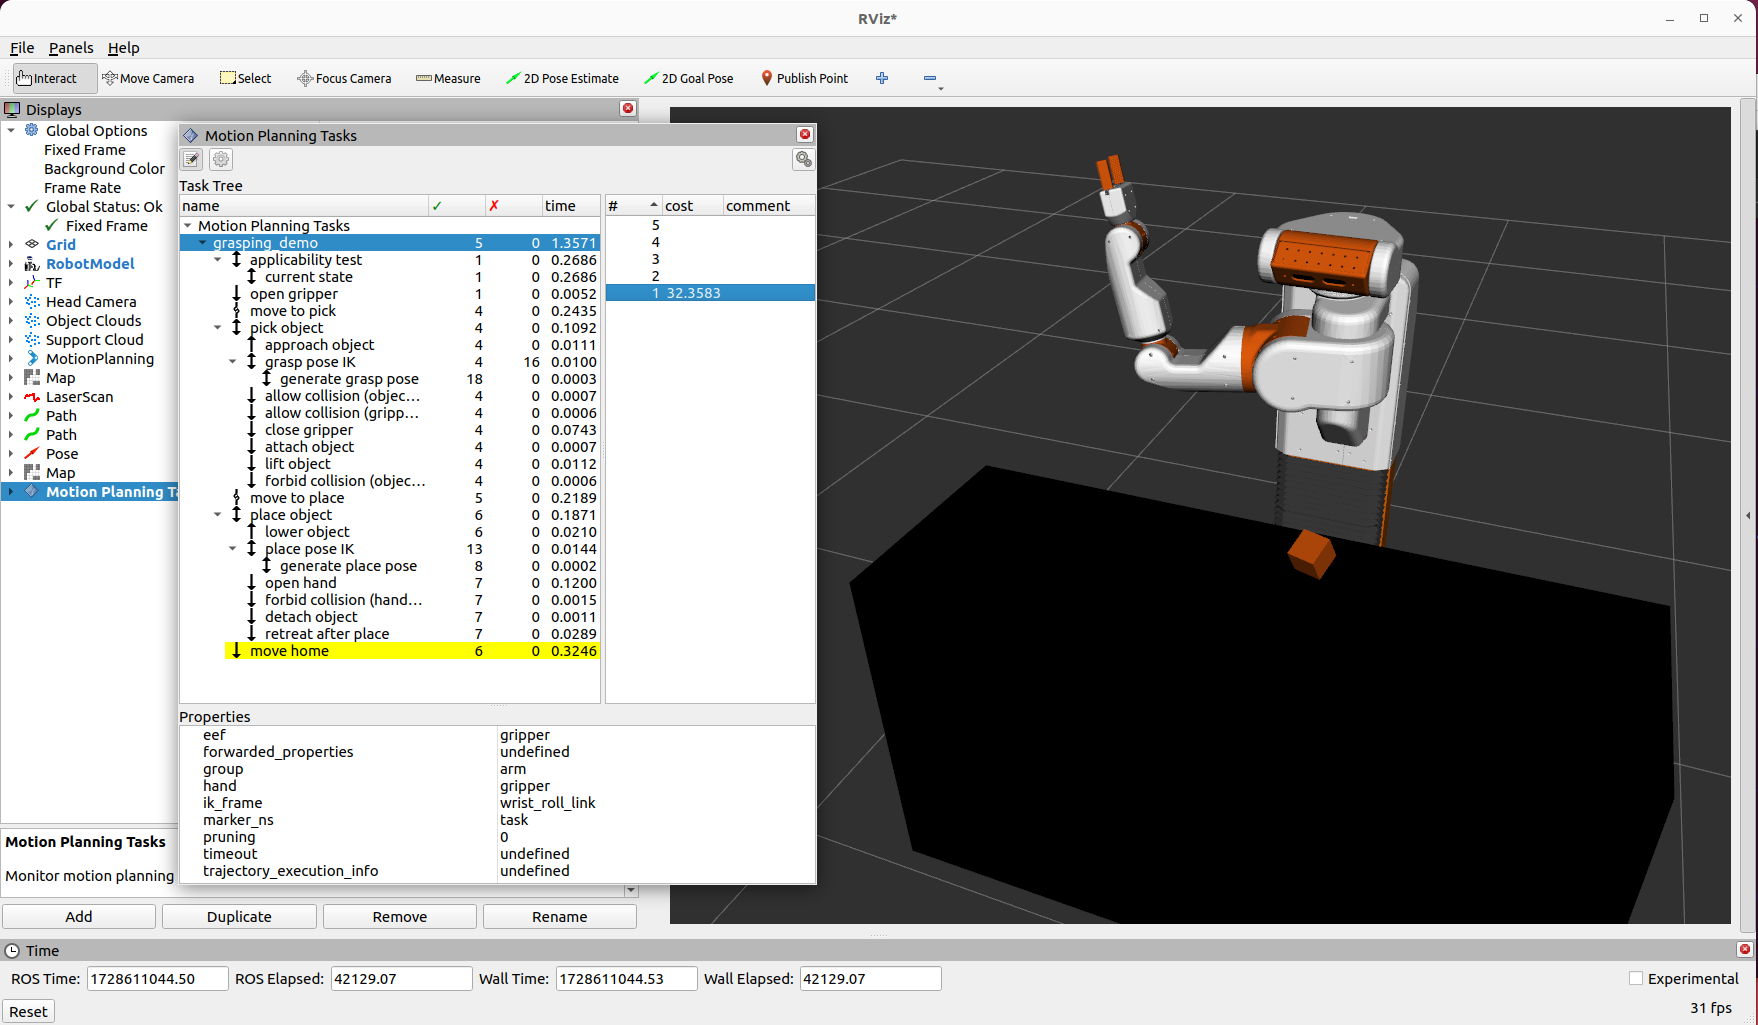
MTC has a nice visualization interface in rviz2 where you can inspect each step in the task. One note
that caused me some difficulty: you need to keep the MTC task in scope or you lose the visualization
in rviz2.
To actually execute the MTC plans, you need to also be running move_group with a modified launch file:
frommoveit_configs_utilsimportMoveItConfigsBuilderfrommoveit_configs_utils.launchesimportgenerate_move_group_launchdefgenerate_launch_description():moveit_config=MoveItConfigsBuilder("ubr1",package_name="ubr1_moveit").to_moveit_configs()# Add the following line to load the MTC capability
moveit_config.move_group_capabilities["capabilities"]=["move_group/ExecuteTaskSolutionCapability"]returngenerate_move_group_launch(moveit_config)
The only part of the MTC that I had some issues with was the Connect stage between the ready pose and
the pre-grasp pose. There was some minor noise in the gripper position, which was causing issues. I found
a closed issue where the following was recommended to be added to the .rosconsole/config file:
This is another blog post that has sat in draft for 2+ years. I’m pushing it out ahead
of ROSCon this year where I’ll be talking about migrating the UBR-1 mobile manipulator
to ROS2.
For a long time I’ve wanted a better open-sourced local controller for ROS navigation.
It’s finally implemented, and has been running on the robot fleet at Cobalt Robotics
for about two years now. The full code of the graceful_controller is available on
GitHub.
Motivation
There are a number of local controllers in the ROS1 and ROS2 navigation stacks, but most
of them are based on either the
Dynamic Window Approach,
Trajectory Rollout, or
optimization approaches such as
Time Elastic Bands.
Both DWA and Trajectory Rollout suffer from a series of challenges:
All of these controllers have many parameters, but the ones for DWA are especially
difficult to tune because they are highly interrelated (for instance the goal, path,
and obstacle biases). This is marginally improved by the DWB controller.
The sim_time parameter is especially difficult to tune for all operating
environments. Too long of a simulation time will make it difficult to enter tight
spaces (except at extremely slow speeds), while too low of a value will cause
instability
DWA requires that users either have very good odometry response, or falsify their
acceleration limits to actually get robots moving. This is a reason so many robots
with low acceleration limits still use the older Trajectory Rollout controller.
Even if these acceleration limits are defined properly, the way the forward simulations
work are pretty crufty.
For this reason, many people replace the default controllers - especially corporate
users of ROS. Sadly most of these improved controllers
don’t get released into the open source.
Goals
The goals for the new controller were quite simple:
Accurately model the robot limitations (acceleration, deceleration, etc).
Accurately forward simulate where the robot will end up.
Produce repeatable results that look smooth and intelligent.
Underlying Algorithms
A number of years ago at Fetch Robotics, I wrote a package for our robots to autonomously
connect to their charge dock. Sometime later, Fetch open sourced the package under an LGPL
license. I used this same underlying control law for the first part of the new controller.
This control law implements a closed-form solution to find a kinematically feasible linear
and angular velocity for a differential drive robot to approach a pose, based on just a few
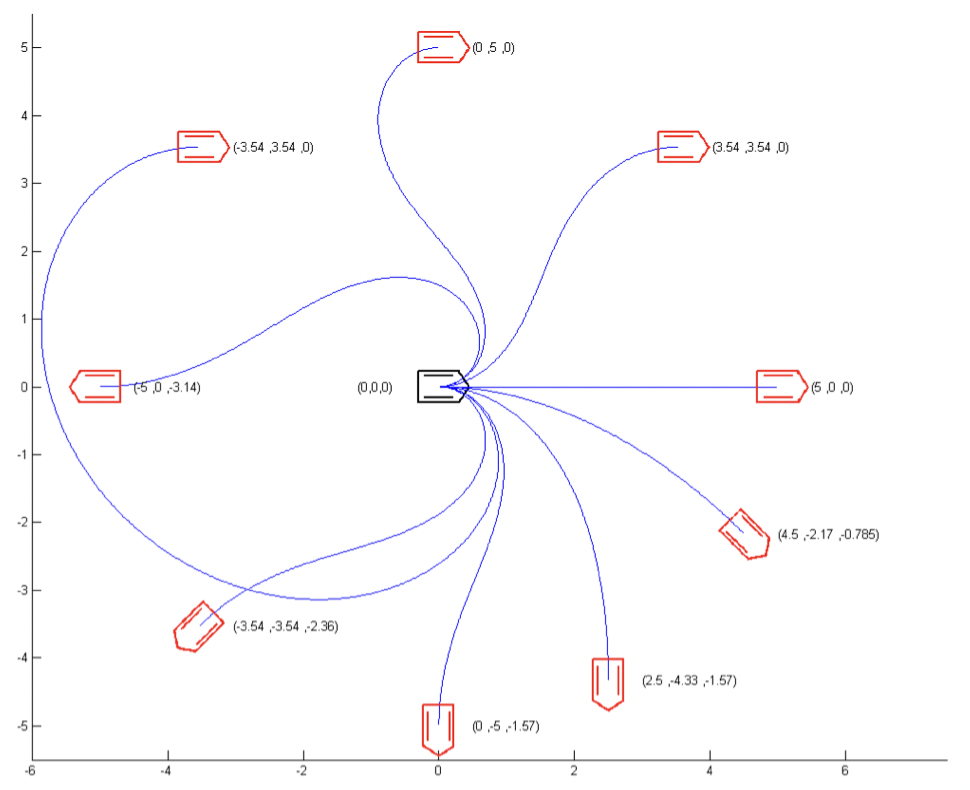
parameters that are actually fairly robot-independent. The image below (from the original paper)
shows some example trajectories:
The underlying control law has a number of nice features:
It automatically slows down for highly curved paths.
It automatically slows to zero as the target pose is reached.
The underlying control law really only works for approaching a single pose - which we call
the target pose. This is exactly what docking with a charger entails. For
something like navigation, we typically need to approach a series of poses in succession
(since following the control law directly towards the final pose in the path is usually not
collision free). Section IV.B of the paper describes a fairly complex approach to do this,
however, our controller takes a simpler approach.
Our controller attempts to use as the target pose the farthest pose in the
path which is both A) less than some maximum lookahead distance away from
the robot, and B) reachable with our current control law parameters without collision.
The reachability portion is implemented through a forward simulation. Unlike DWA, the
forward simulation is not time-based, but rather terminates when we have reached the
target pose. Additionally, since the target pose is the farthest that we
have collision checked, we will actually forward simulate based on stopping at the target
pose.
The new controller is built out of two ROS packages. The first package includes the
underlying control law, which is licensed under the LGPL. The second package implements
a ROS1 or ROS2 plugin for navigation, and is licensed under BSD since it is loosely
based on the DWA codebase.
Additional Features
While the basic control law with target pose simulation works fairly well, there are
a number of additional improvements implemented:
Optional initial rotation - since the control law can cause the robot to take
large sweeping arcs when the target pose is behind or to the side of the robot, we
implement an optional initial in-place rotation that points the robot towards the
target pose. If in-place rotation is not possible (due to collision), the regular
control law will be applied.
Optional final rotation - similarly, for the final pose, it is possibly preferred
to approach the final pose without considering the heading of the pose. Once at the
final pose, the robot can rotate to the final goal orientation.
Footprint Scaling at Speed - this feature inflates the robot footprint
at higher speeds. This allows the robot to move quickly in more open spaces but
naturally slow down when the environment gets tighter.
Orientation filter - can be used to smooth out the orientations of the
poses in the global plan.
ROS2 Support
As it turns out, porting to ROS2 was fairly straight forward. Improvements to the controller
API in ROS2 mean that the following features are far easier to implement:
The controller command velocity generation API natively passes the current robot speed,
which negates the need for additional boilerplate that existed in the ROS1 controller
to listen to the odometry feedback.
The notion of variable speed limits is native to Navigation2, and the controller has
an API for it.
The goal checking is split out to a different plugin.
Future Work
There have been quite a few developments since I first started working on this controller
in early 2021.
The Nav2 project added the MPPI controller, which addresses many of my concerns with
both DWA and Trajectory Rollout. My only issue with this controller is that it uses
special SSE/NEON instructions for parallelization, and so it doesn’t work on all CPUs
(in particular, I found it wouldn’t work on the very low end Celeron processor in
my FireBot).
An alternate implementation of the control law was also added to Nav2 as part of the
docking server project. It’s not quite ready to be a full controller yet, but at some
point I expect that version to supersede the ROS 2 implementation of my graceful controller
package.
Kudos
This work was supported in part by Cobalt Robotics.